How to Create a To-Do List in WordPress

Each day people are finding innovative ways to use WordPress. One of these innovative uses of WordPress is for collaboration and productivity. There are many WordPress themes and plugins that make collaboration on WordPress easier. We have already written about Editorial Workflow, When it comes to productivity, WordPress has solutions like Edit Flow, Document Management, and Post forking. However, nothing boosts productivity more than a good old fashioned to-do list. In this article, we will show you how to create a to-do list in WordPress.
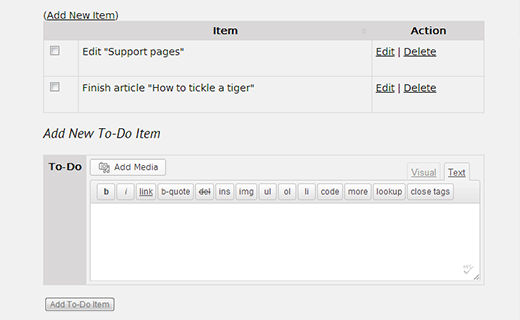
First thing you need to do is install and activate the Cleverness To-Do List plugin. Upon activation the plugin adds a new “To-Do List” menu item in your WordPress admin bar. Clicking on it will take you to the To-Do list page where you can add new items to your list.

To-Do list has support for multiple users, and it can be used to create To-Do list for all users of your WordPress site. To configure to-do list settings, you need to go to the To-Do List » Settings page. There are three types of To-Do list views available.
- Individual – Each user can create and manage their own to-do list.
- Group – All users can work together on a single to do list.
- Master – Allows you to have one master list for all users where each user has their own individual completions.

If you are using the To-Do List as a group or master list, then you must check theUser Permission settings to make sure that users can only edit the items they own. On this page you will notice that each option has certain capabilities listed next to them. Instead of using user roles, the author of the plugin has decided to use the capabilities. Subscribers can Read, contributors can Edit Posts, authors can Publish Posts, editors can Edit Others Posts, and administrators can Manage Options.

To-Do List works well in the WordPress admin for those users who have access to your wp-admin area. The plugin also comes with a widget and shortcodes to integrate it to the front-end of a WordPress website. To add the to-do list admin area to the front-end of your WordPress site, you need to create a new post or page and add the following shortcode:
[todoadmin]
Only registered users of your site with the permission to add or manage to-do list items will be able to see this. Logged out users will see a notice that this content is only visible to logged in users.
You can display your To-Do list in a WordPress post or page using shortcode
[todolist]. Aside from shortcodes, you can also add your to-do list to the sidebar using widgets. Go to Appearance » Widgets and drag/drop the To-Do List widget to your sidebar.
We hope that this article helped you add a to-do list on your WordPress site. From our experience, to-do lists can help boost productivity. Do you use a to-do list to boost your productivity? Which tools or apps do you use to manage your to-do list? Let us know by leaving a comment below.
Labels:
Wordpress


 My name is MUHAMMAD ZEESHAN I'm student of Bsc(cs). I am 18 years old now. Currently, i live in Bahawalpur, Pakistan. By Profession I'm a Web Designer, Graphic Designer, Computer Instructor Blogger and Video Editor.
Contact:03464723239
My name is MUHAMMAD ZEESHAN I'm student of Bsc(cs). I am 18 years old now. Currently, i live in Bahawalpur, Pakistan. By Profession I'm a Web Designer, Graphic Designer, Computer Instructor Blogger and Video Editor.
Contact:03464723239
0 comments: